Hello Reader,
Playing with Java Script is common to all Developers and Dynamics 365 Technical Consultant, Therefore, there are some of the tips and trick which should be followed while working with Java Script.
Some of the tips and tricks are listed below :
Tip 1* Create Namespace of Web-Resource: During working with Web-resource, It is a good practice to use Namespace. Sometimes, It becomes big task to investigate error in large and complex Implementation and that too frustrating if it is causing from the silly mistake and took millions of hours for investigation hahaha
One of the reason is, There are same name function in other Web-resources too. So, during compilation calling function gets confused which function to refer to as it is getting multiple references.
Let’s take an Example.
Scenario 1: If Namespace is not defined.
There are three Web-Resources A and B and C, function xyz is written in Web-Resources A and B, Web-Resource C’s function pqr is calling-function xyz,
During compilation function pqr gets confused as there are two different paths to refer.
function pqr()
{
xyz();
}
Scenario 2: When Name space is defined
a is the namespace of Web resource A, b is the namespace of Web resource B and c is the namespace of Web resource C and taking the same scenario as above xyz function is being called by pqr with no confusion since Namespace is defined and there is only one way to traverse.😊
function pqr()
{
a.xyz();
}
function pqr()
{
b.xyz();
}Tip 2* One Onload function: Keep all the function in one function, which is being called on-load event of form. It enhances System Performance and takes less time on load.
Page_OnLoad = function () {
mno();
stu();
xvw();
}

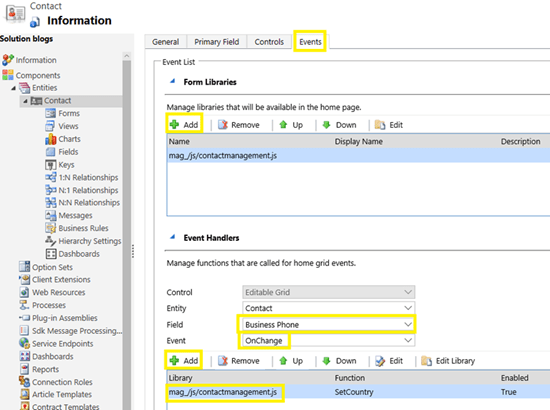
Tip 3* Don’t register On-change Event handler programmatically: According to developer’s choice, Attribute on-change event should be configured on from. Try to avoid writing formContext.getAttribute(arg).addOnChange(function); in java Script.
To Configure follow the below steps:
>>Go to the Field Properties
>>Click on the Events tab(third from last)
>>Register your function.
Tip 4* Have Common Web-resource commonly used function like WebAPI Call: Should have common Web resource ready where you can have all the commonly used function like Web API Calling function for retrieve Multiple and Single Records or retrieve user access based on Security Role.
if (typeof (MSP) == "undefined")
{ MSP= { __namespace: true }; }
MSP.Common = {
    CommonLibrary: function () {
    },
    RetrieveSingleRecord: function (entityName, entityId, columns) {
        var results = null;
        var entityId = entityId.replace("{", "").replace("}", "");
        var req = new XMLHttpRequest();
        req.open("GET", encodeURI(Xrm.Page.context.getClientUrl() + "/api/data/v8.0/" + entityName + "(" + entityId + ")?$select=" + columns + ""), false);
        req.setRequestHeader("OData-MaxVersion", "4.0");
        req.setRequestHeader("OData-Version", "4.0");
        req.setRequestHeader("Accept", "application/json");
        req.setRequestHeader("Content-Type", "application/json; charset=utf-8");
        req.setRequestHeader("Prefer", "odata.include-annotations=\"OData.Community.Display.V1.FormattedValue\"");
        req.onreadystatechange = function () {
            if (this.readyState === 4) {
                req.onreadystatechange = null;
                if (this.status === 200) {
                    results = JSON.parse(this.responseText);
                }
                else {
                    results = this.statusText;
                }
            }
        };
        req.send();
        return results;
    },

    RetrieveMultipleRecords: function (entityName, Columns, filter) {
        var results = null;
        var req = new XMLHttpRequest();
        req.open("GET", encodeURI(Xrm.Page.context.getClientUrl() + "/api/data/v8.0/" + entityName + "?$select=" + Columns + "&$filter=" + filter + ""), false);
        req.setRequestHeader("OData-MaxVersion", "4.0");
        req.setRequestHeader("OData-Version", "4.0");
        req.setRequestHeader("Accept", "application/json");
        req.setRequestHeader("Content-Type", "application/json; charset=utf-8");
        req.setRequestHeader("Prefer", "odata.include-annotations=\"OData.Community.Display.V1.FormattedValue\"");
        req.onreadystatechange = function () {
            if (this.readyState === 4) {
                req.onreadystatechange = null;
                if (this.status === 200) {
                    results = JSON.parse(this.responseText);
                }
                else {
                    results = this.statusText;
                }
            }
        };
        req.send();
        return results;
    },

    __namespace: true
};
Tip 5* Try avoid to use Global variable: Due to conflict between functions sometimes global variables refers incorrect values which cause error in other function and creates unnecessary pain to developers.
Hope it helps.
May the Dynamics Power be with you!


![Azure Logic Apps|used case[Dynamics 365 Integration with HubSpot]](https://derivingdynamics.home.blog/wp-content/uploads/2019/09/azure-logic-apps-1.png?w=560&h=315&crop=1)