There are must select following entities while migrating configuration data of product catalog from one instance to another instance (Dev to Preprod /Preprod to Production) using Configuration Migration Tool.
Is it not a good learning experience,where you do relative comparison? I wrote a JavaScript to understand how formContext.ui.formSelector and its sub property work completely.
Please, take a look on high level overview of formContext.ui.formSelector
which is tabulated below.
Scenario: I took the scenario where will set entity form based on option set value.This scenario covers ui.formselector entirely, likewise as:
var formContext;
function setForm(executionContext)
{
formContext = executionContext.getFormContext();
if(formContext.ui.getFormType()==1)
{
return;
}
if (formContext.ui.getFormType()==2)
{
var caseType = formContext.getAttribute(logicalname).getValue();
switch(caseType)
{
case 1:
changeForm(“Claim”);
break;
case 2:
changeForm(“Trial Order”);
break;
default:
changeForm(“Case for Interactive experience”);
}
}
}
function changeForm(formName)
{
var currentForm = formContext.ui.formSelector.getCurrentItem();
var availableForms = formContext.ui.formSelector.items.get();
if (currentForm.getLabel().toLowerCase() != formName.toLowerCase())
{
for (var i in availableForms)
{
var form = availableForms[i];
// to find a form based on the name
if (form.getLabel().toLowerCase() == formName.toLowerCase())
{
form.navigate();
return true;
}
}
}
}
Call this function on page load event and make sure that this code is present on all other forms.
Testing: I am creating case record from default case form by putting up case type as Trial order.Once record is saved.It will navigate screen to trial order case form and have similar behavior for claims case form too.
Hope it is informative! 🙂 Keep dynamics-power with you.
While I was working on Ribbon Workbench customization, one
of my colleague addressed me that custom button icon is showing as jigsaw image
in UCI interface whereas button’s icon is showing as desired in classic
Interface. My colleague was questioning if it is a Microsoft issue or anything
else which is missed to be done?
Workaround:
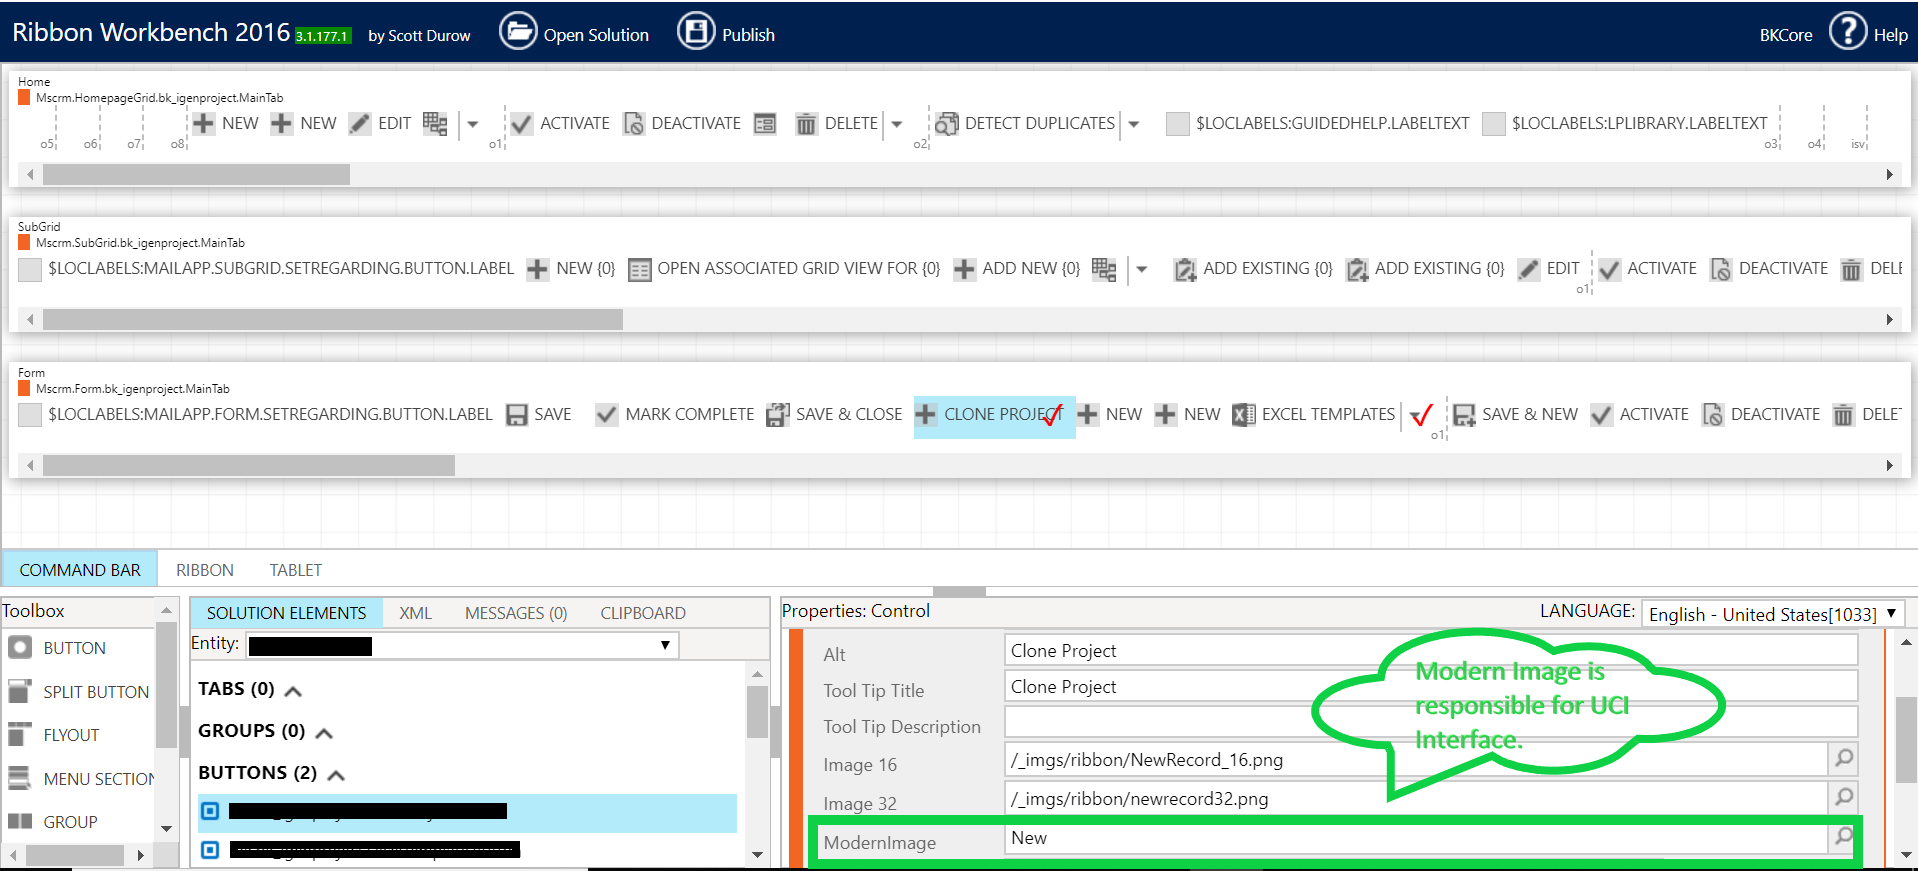
I went to Ribbon Workbench Customization, There I noticed
one more new input i.e. ModernImage.
Modern Image supports Vector format (SVG) and responsible for UCI(Unified
Client Interface) visibility.
Therefore,16X16 image, 32X32 image is responsible for Classic
View. Even you can test it at your own. Remove these 16 or 32 png from Ribbon Work
Bench then publish it, you will not see them in Classic Interface😊
Fix:
All you need to do it. Create a Vector format (SVG) web
resource. Go to Ribbon Workbench, Select your Solution, Browser your SVG icon
image under Modern Image and then good to go to publish it.
Even though Dynamics 365 Customer Engagement is being changed a lot. Perhaps, some technical questions are pretty basic and commonly asked in most of the interview. I have listed few of them below:
Question #1: How will you optimized form performance when you have multiple tabs/grids on the entity form.
Answer: While placing sub-grid on form we should unchecked the Expand this tab by default from tab properties. It saves page rendering time and enhance the page load performance.
Question #2: What is the difference between Plugin and Workflow? (Being a developer we always deals with plugin and workflow. So, This is something from which you can’t remain untouched. 😊)
Answer: Some of the differences are detailed below:
Workflow
Plugin
Compatibility
Synchronous /Asynchronous*
Synchronous /Asynchronous
Maintenance
Business Users /Functional Consultant
Technical Consultant
Nested Child Process
Yes*
No
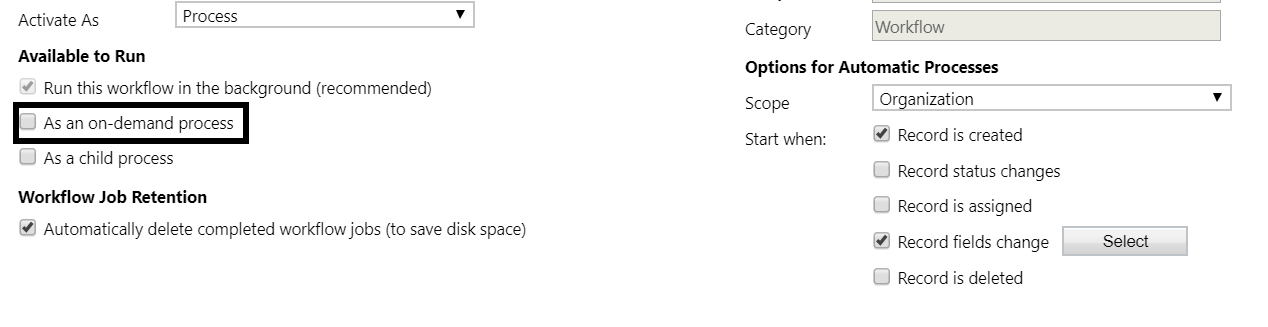
On Demand
Yes
No*
Run As
Organization User Business Unit Parent:Child Business Units
Organization User Context User Impersonation (To run plugin on another user context.)
Get External Data
No*
Yes
Triggers
Record is created Record Status changes Record is assigned Record fields change Record is deleted
Create Update(Filtering attribute) Delete Associate Disassociate Status Change Assign to Owner
Executed After Save
Yes
Yes
Can run on Relationship
N:1(lookup on the record)
1:N
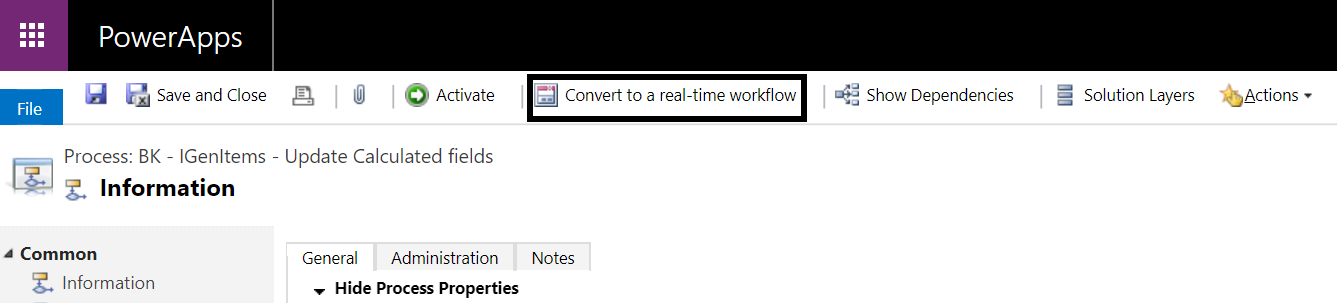
Note Compatibility* : Earlier Workflow was asynchronous until Microsoft enable Convert to a real-time Workflow.
Note Nested Child Process*: Nested Child Process is very useful. Commonly used scenario i.e.to send mail to employee on their birthday.
Note On Demand*: Through customization Plugin can also run on demand. Though it requires custom Button where you must write JavaScript function to run it. However, this process take two calls which decreases system performance.
Note Can run on Relationship*: Workflow cannot automatically update all the contact addresses when the parent account address changes. But this can be done with a plug-in.
Question #3 : What will execute first business rule or java script?
Answers: execution order is defined below:
1.System Java Script(Source code by MS)
2. Custom Java script
3.Business Rule.
Reason: business logic is applied to Business rule will be converted to Java script and then gets executed On other side custom java script doesn’t required any conversion So it saves conversion time and executes first.
Question #4: What are the event pipeline stages and its number?
Answer: Event pipeline stages are 4 and plugin/workflow can register in 3 stages out of 4.
Event
Stage Name
Stage No.
Description
Pre-Event
1. Pre-Validation
10
It is executed before the main system operation. Registered plugin gets executed before the database transaction. Pre-validation stage occurs prior to security role check and mainly used delete plugin message.
2. Pre-Operation
20
It is executed before the main system operation. Registered plugin gets Executed within the database transaction.
Platform Core Operation
Main Operation
30
It doesn’t allow to register custom plugin. it is the main operation of System(Source code by Microsoft)
Post-Event
Post-Operation
40
It is executed after the main system operation. It allows to register custom plugin. Registered plugin gets executed within the data base transaction.
Question#5: What is the time limit of plugin/Custom workflow execution?
Answer: It’s 2 minutes(like Maggie 😊)Irrespective of Synchronous/Asynchronous,There is 2 minutes time limit imposed on execution. If execution exceeds the limit a System.TimeoutException is thrown.
Note: While we code and gets Business Error“This workflow job was canceled because the workflow that started it included an infinite loop. Correct the workflow logic and try again” which is showed 7 iteration steps. Reason being, execution time limit is 2 minutes.
Earlier I wasn’t known how to integrate HubSpot to Dynamics 365 then I started deep diving into it and come to know there are various methods to do it. These methods are mentioned as below:
HubSpot integration to Dynamics 365 using Zapier
Dynamics 365 CE integration to HubSpot using Logic Apps (If you want to see ‘how’ click here)
Here I will tell you the detailed steps to integrate HubSpot
to Dynamics 365 Customer Engagement using Zapier. Zapier is a web automation
app and allows HubSpot to connect with several other 1000’s application and
technology. With Zapier I will build Zaps which will automate the process.
#2: Enter Email Address and Password then click on Log in.
#3: On the top, Click to settings,
#4: In left panel, Expand
Integrations and click on Apps below API Key.
#5: Click on Connect an app
#6: You will see some recommended apps over here. Though our
intended application is Zapier. Click on Zapier you will be navigated to next
screen.
#7: Click on Connect. Since it’s not Microsoft Technology. It doesn’t support single sign-on until you sign up with the same account. So, in next screen it will ask you login to Zapier. Here, I am assuming that you have Zapier credentials with you already. If you don’t have. Do sign up and be continued as per below detailed steps.
Now you are connected to Zapier.
Section 2: Making of Zap once you are connected with zapier.
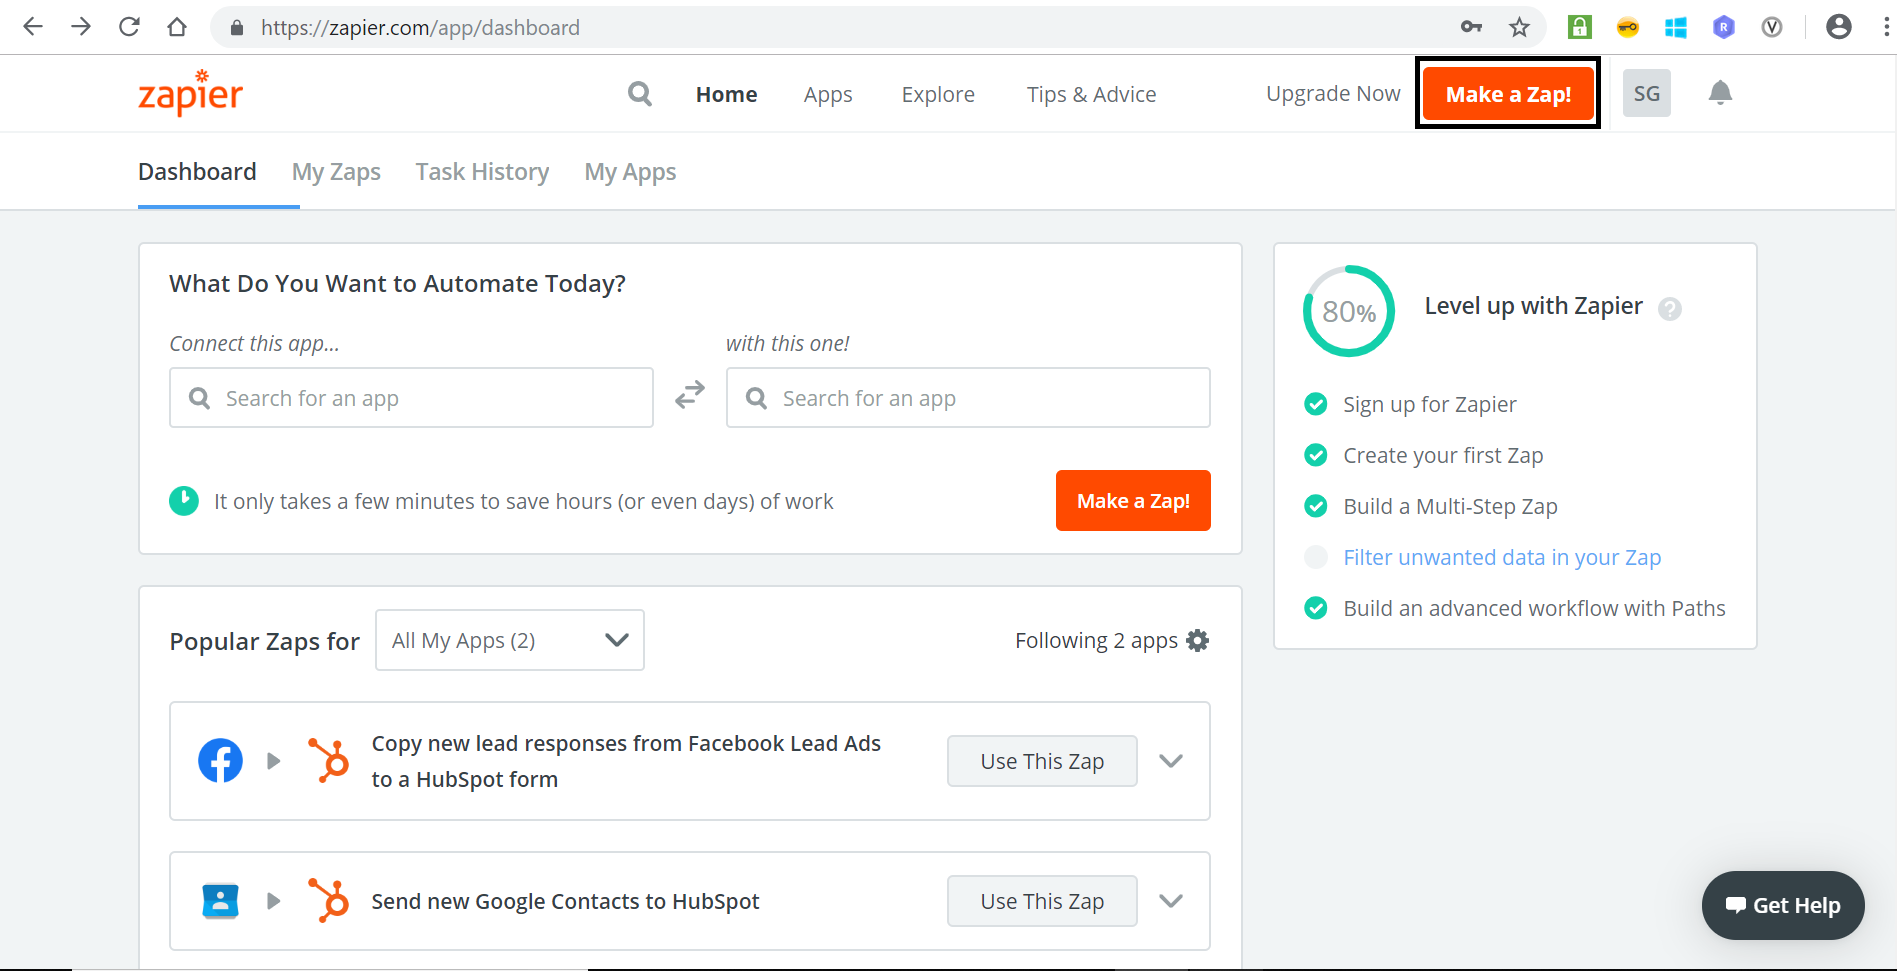
#1: Now you are at Zapier screen where you will create Zap.
Click on Make a Zap!
#2: Write name of your zap. I wrote MydemoZap. then choose a
Trigger App. I searched for HubSpot and get connected with it.
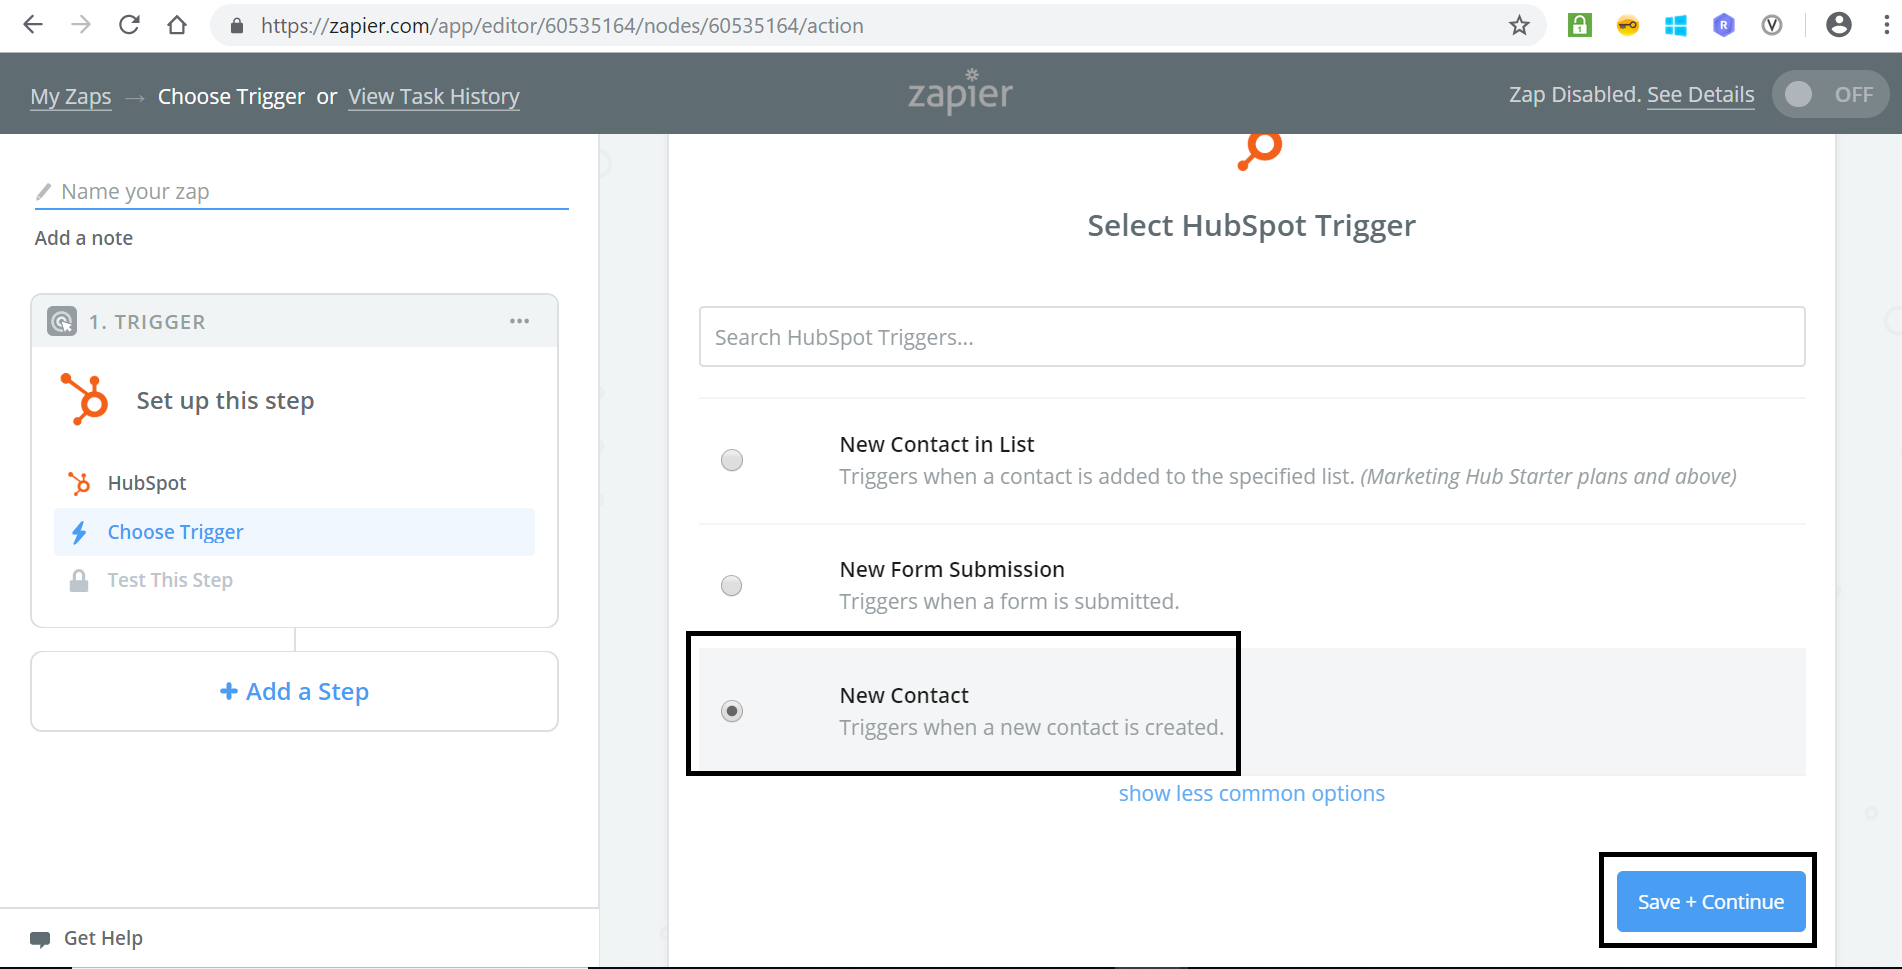
#3: Choose Trigger. I have chosen New Contact. It triggers when contact is created. Move further, click on Save+Continue.
#4: Connect to your HubSpot instance. One screen will pop-up, on click of Connect an Account. it will ask for permission. Click on Grant Access to give permission of HubSpot then this screen will disappeared and you will be on same page, Post that click Save+Continue.
In this step, I am collaborating consecutive screen as
below.
Click on Connect an Accountclick on Grant accessClick on Save+Continued
Thus you are done with trigger now. 🙂
#5: Add a new step for Action. Search for Dynamics 365 CRM Action. I have chosen create contact since it is our objective. (Refer objective).Moving forward click on Save+Continue.
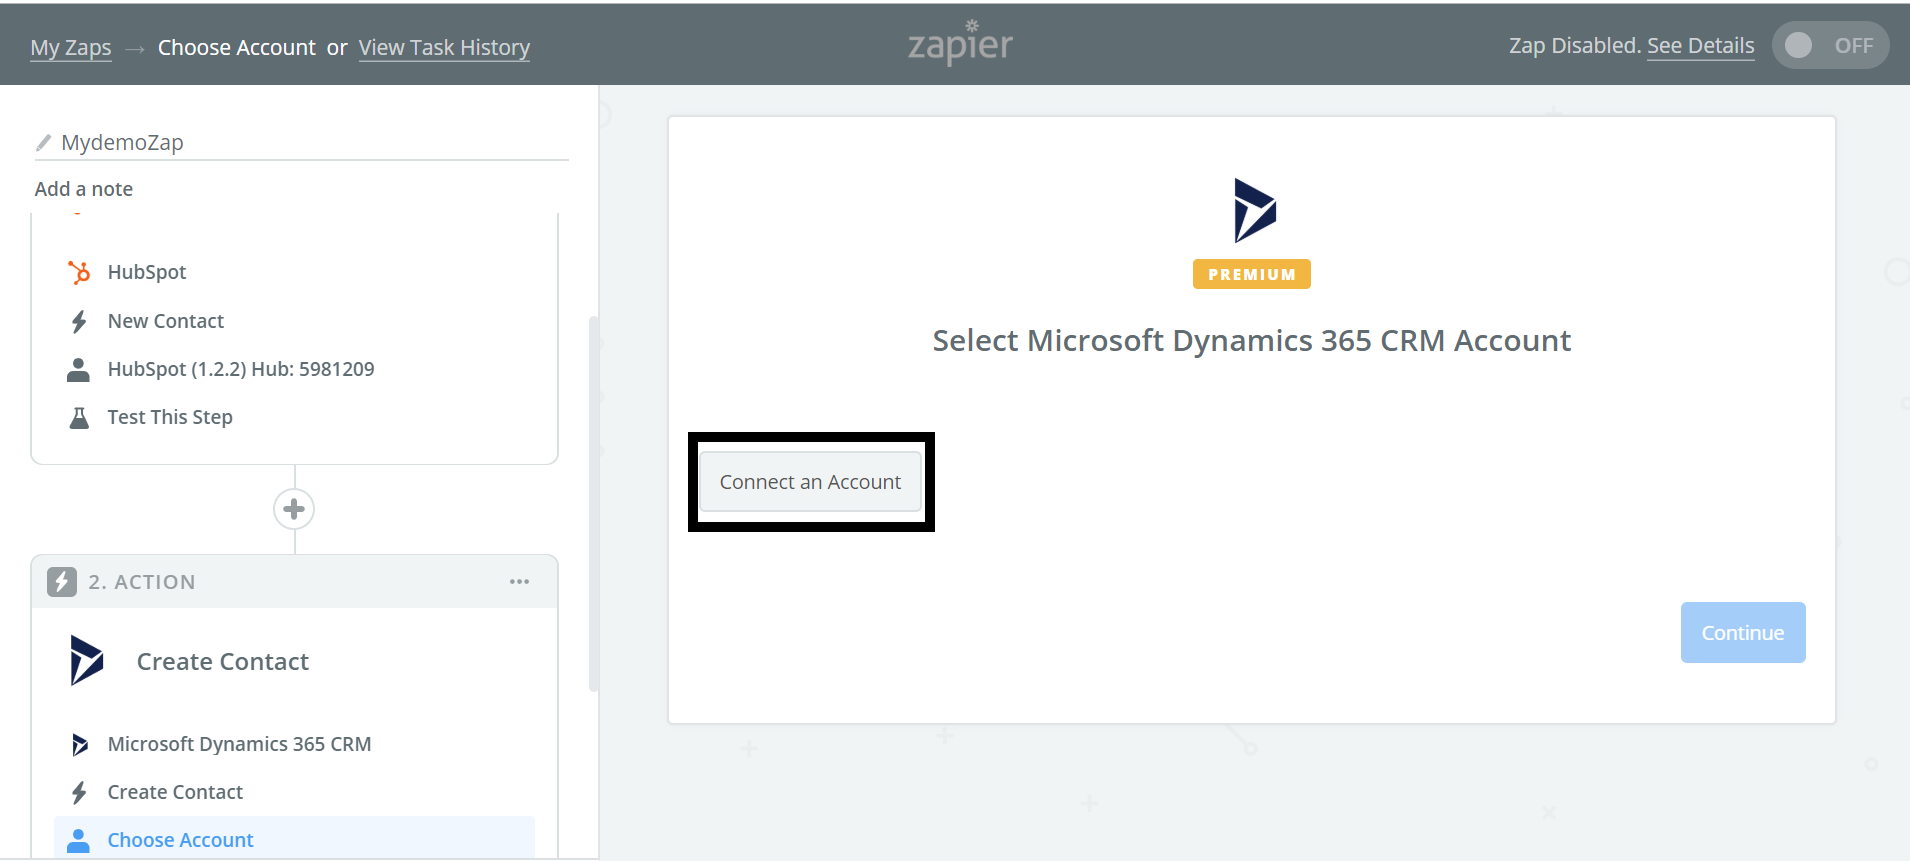
#6: Connect to Dynamics 365 CE. Click on Connect An Account.
Post that, paste organization url in new pop up screen and click on to Yes,
Continue. To authenticate yourself put user credentials and make sure that you
are using administrator user. You will be land on same page. Click on
Save+Continue.
I have collaborated screen for this step as below:
Click on Connect an AccountEnter Dynamics 365 organization url and click on Yes,ContinueClick on Save+Continue
#7: Edit Template is 2nd last step. As per your requirements map the values in given template. I have mapped for first name, last name and email address. 😊 for demo and click on Continue.
#8: Full and final step is here. 🙂 Click on Finish and Enable your zap at the top on the same page.
We are ready with our integration. Yipee!
Final Result:
I went to HubSpot and created new contact as per below screen:
And same contact is created in Dynamics 365 Customer Engagement.
Limitation: Generally, Business doesn’t permit to use Zapier since Zapier stands with several pricing plans. However, it costs way more to business.
Other than this, the Clock is still ticking for versa data flow from Dynamics 365 CE to HubSpot.
I was assigned a task where business requirements were to integrate HubSpot to Dynamics 365. Being a Dynamics’ folk, I was unknown to the term HubSpot itself and was also like other Dynamics’ enthusiasts who were also new to this term. Then during my research journey, I got to know that it is CRM like our Dynamics 365 CRM or like any other CRM which is present in the market. HubSpot has its two flavors Professional and Enterprise. Marketing Hub Professional and Sales Hub Professional is more advance than Sales Hub Enterprise and Marketing Hub Enterprise.
Since it was POC I don’t have HubSpot instance yet. This was
the time when I realized that I should have source(HubSpot) instance first to
integrate it with Dynamics 365. It should be my priority to get HubSpot
instance ready before starting the actual work.
Here, are the steps to get your HubSpot instance ready.
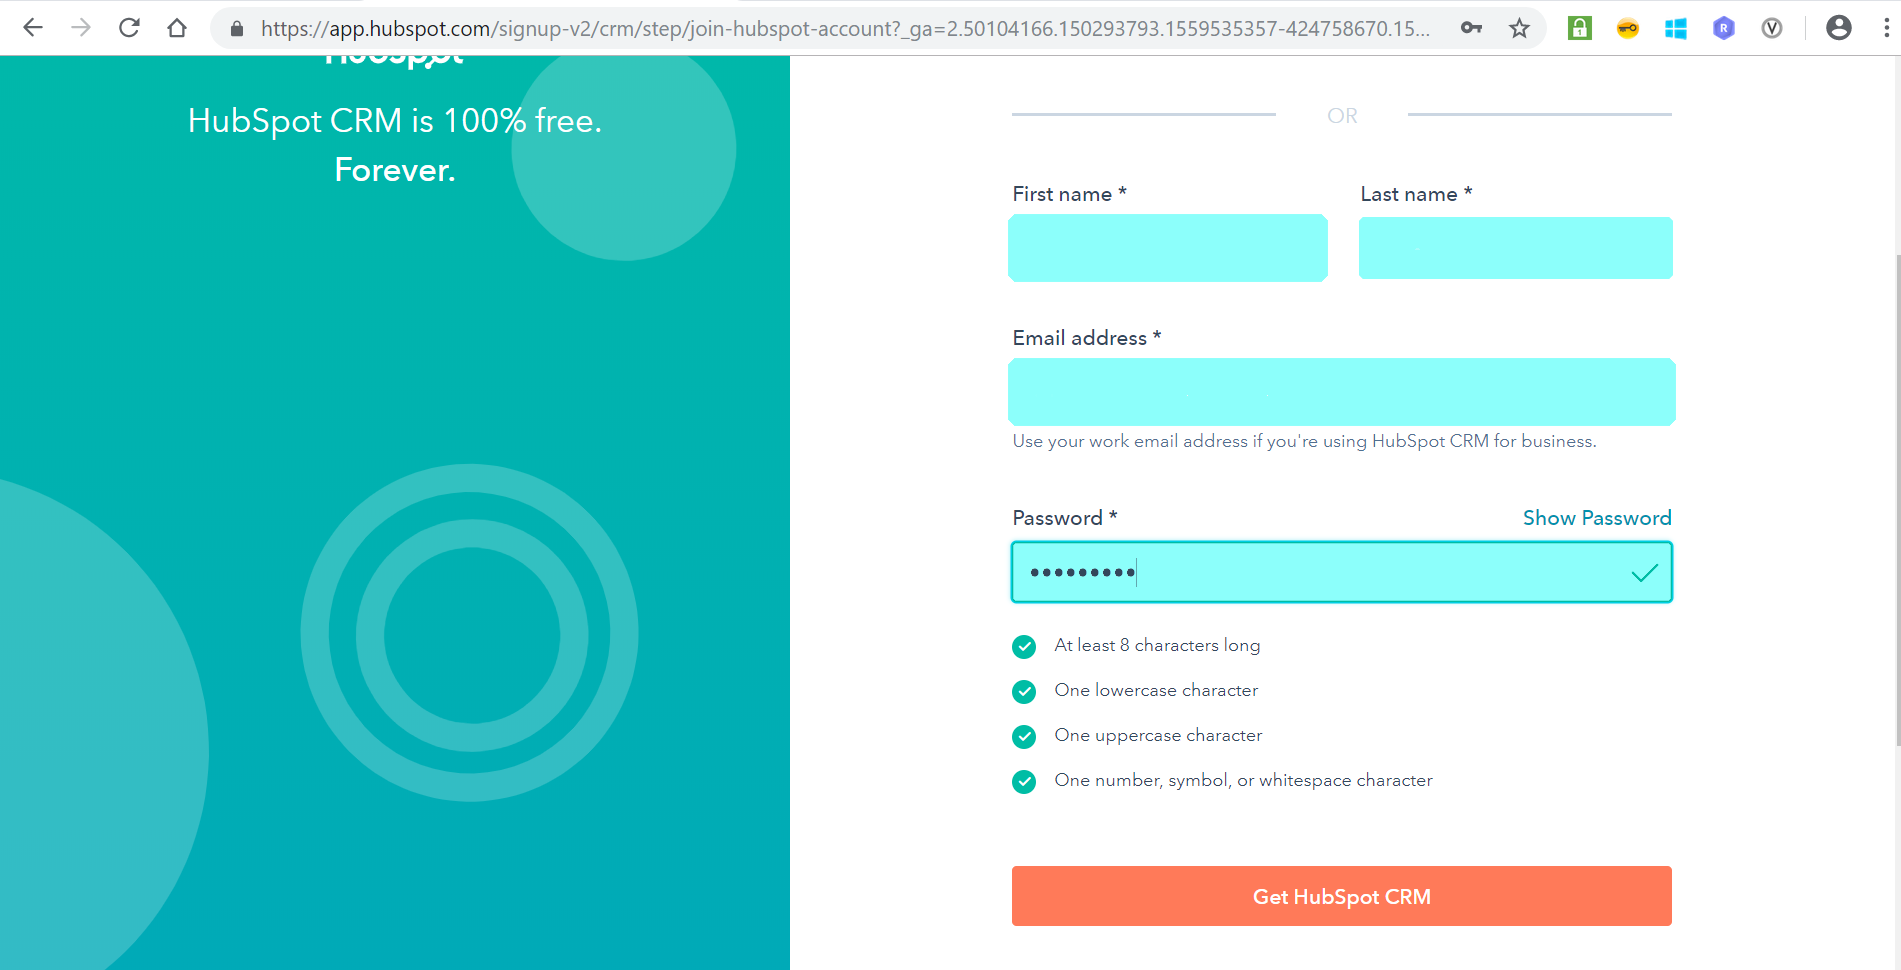
#3: Fill all the details which is required in below screen
likewise: First name, Last name, Email address, Password. Post that, Click on
Get HubSpot CRM
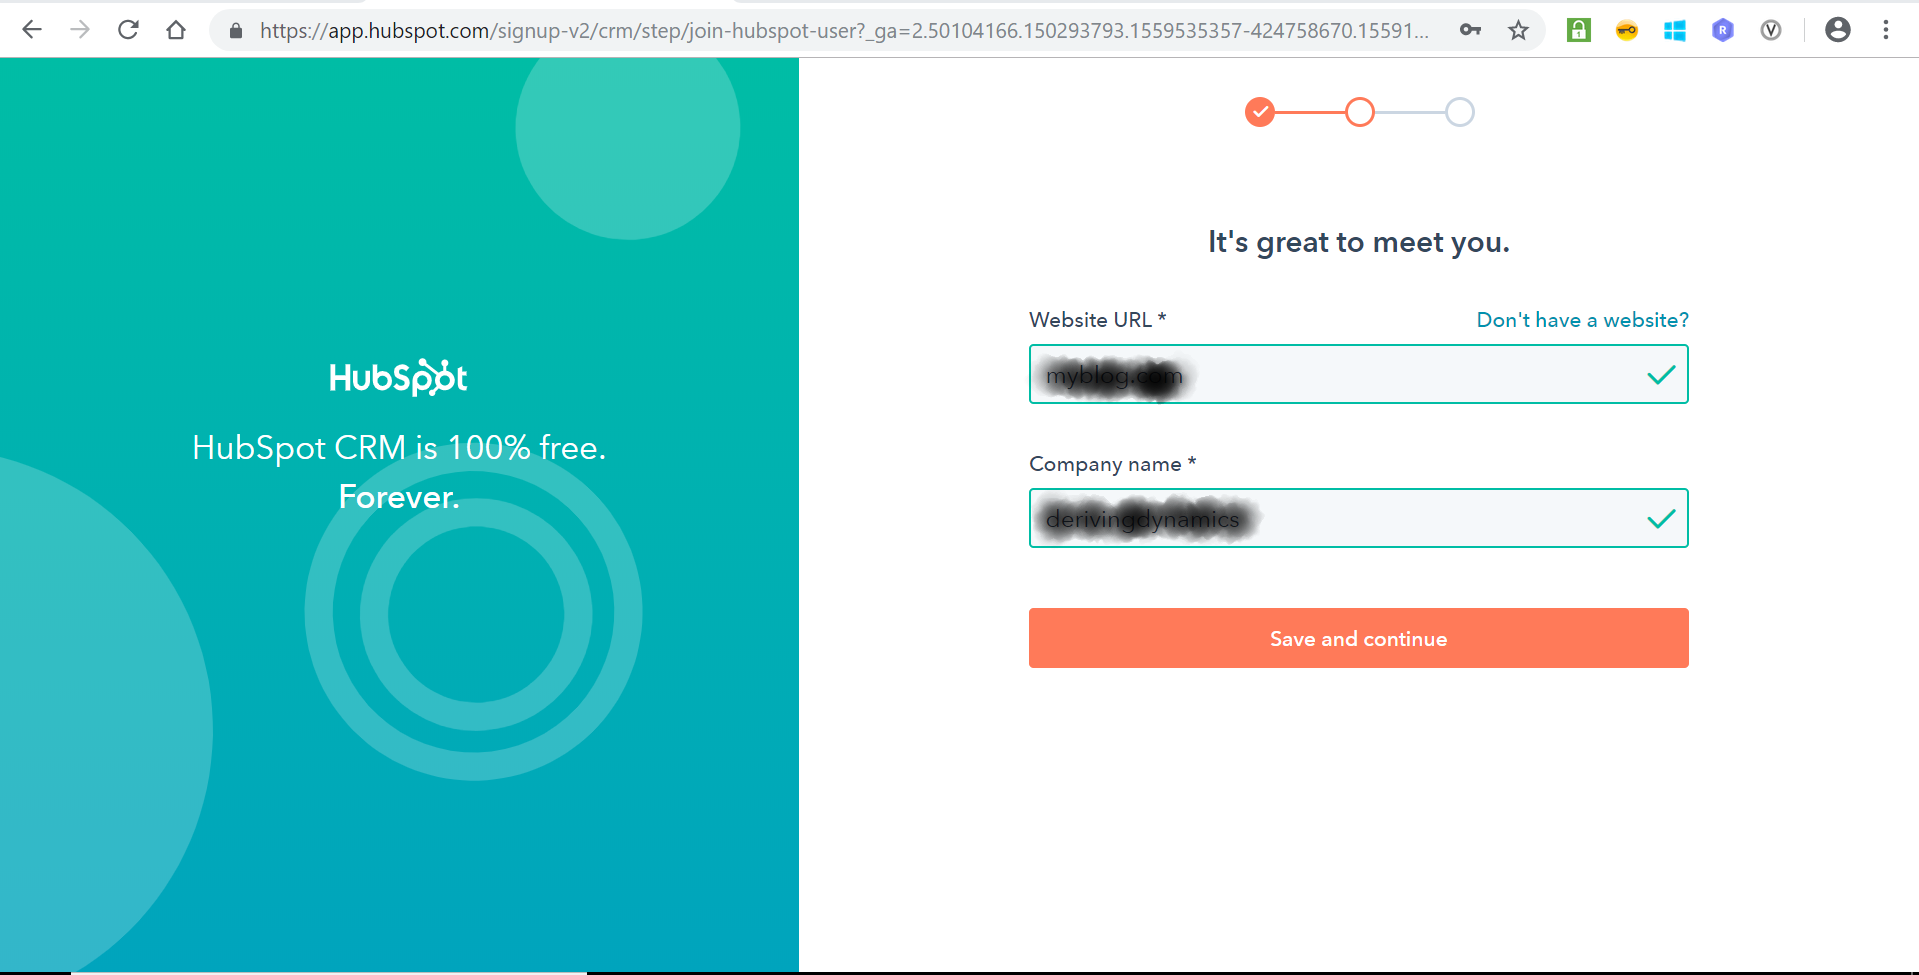
#4: Enter Website URL and Company Name and click on Save and
continue.
Here, you are ready to go and to explore more.!
Since it was prerequisite to start with integration work. So, In my next blog series I have covered “How to integrate HubSpot to Dynamics using Zapier” click here
I am requesting to please be tuned for “How to Integrate HubSpot to Dynamics 365” using several other methods.
Few prominent icons are added to the column for a better user interface which is also shown in UCI.
Firstly, I dug into SDK, and found displayIconToolTip method which consists of two parameters-rowData and userLCID (Note: LCID is not taken.) as English is the default language of the organization.
Implementation:
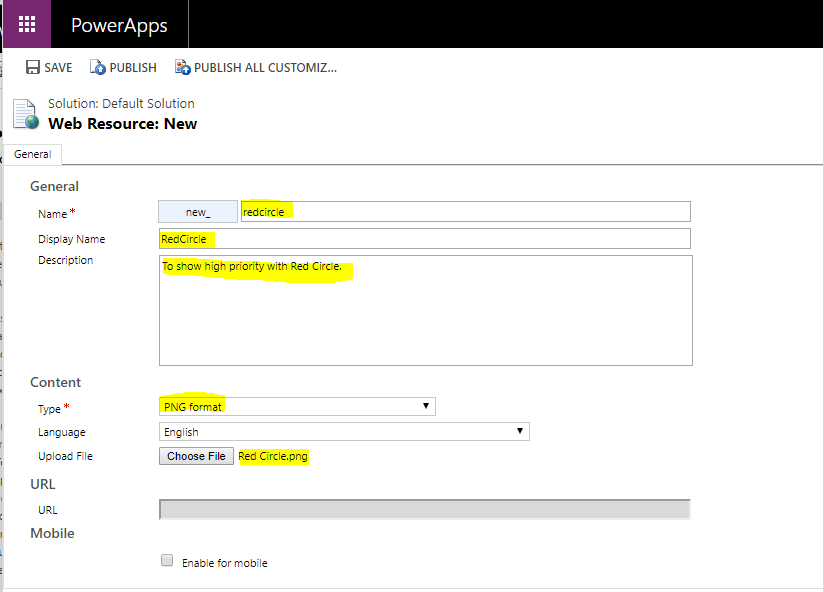
Step 1: Take any three pictures of 16X16 .png files and create Web Resource of .png format. If picture exceeds 16X16, it will automatically shrink to 16X16.
Step 2: Navigation: Settings>>Customize the System. In the left panel,Click on Web Resources .Then click on New in right panel.
Step 3: Fill Name, Display Name, Description of Web Resource, choose type as PNG format and upload the image as below.
Note: Repeat above mentioned Steps 1 to 3 for rest of the two .png Web Resources.
Step 4: Create JavaScript Web Resource and paste the following code: (Replace imgName as per your wish)
Step 5: Now,Call this function in your respective Views, I have chosen the Active Cases view and selected the priority column.
Step: 6 Click on Change Properties and call your JavaScript Web Resource function as shown below.
Microsoft has released a preview of its April release on 1st Feb 2019 that allows us the flexibility to explore the features, adoption of all changes and the user experience updates for Dynamics 365 and the Power Platform which will be enabled by default in April 2019.
Note: Once you enable the April 2019 update, it can’t be turned-off.
Step2: On selecting, it will go to environment’s hub, where click on manage.
Step3: Click on Active now, it will take you to confirm screen.
Step4: Enter your environment name and click on continue.
It will take a while to activate the April 2019 update. Once it’s done same will be notified as “April 2019 update is now active” and April 2019 update is On now in update section on the bottom or right hand side.
As we
know, Unified Client Interface is introduced in Dynamic 365 Customer
Engagement, where dynamics folks were busy to look its new features and how
Unified Interface distinct from Web Client.
I also did
some analysis of comparison between UCI and Web.
Here,
Properties are listed below:
S.No.
Field
Properties
UCI
Web
1.
Composite
Name/Address field
No
Yes*
2.
Turn-off Automatic
resolution in field
No
Yes
3.
Disable most
recently used items for this field
Yes
No
4.
Available on Phone
Yes
No
5.
Display search box
in Lookup dialog
No
Yes
6.
Inline View Search
Match highlight
Yes**
No
7.
Lookup View Columns
Yes***
Yes***
Note*: Composite Name Field
Composite Address Field:
Note**: Inline View Search Match highlight
Note***: UCI shows 2 columns until click on
expand arrow where Web client shows 3 columns at its max.